 Maat/ Size: customStof/ Fabric: katoen/ cotton
Showing posts with label diy. Show all posts
Showing posts with label diy. Show all posts
18 Apr 2024


22 Sept 2023
simpel telefoonhoesje / simple phone sleeve

- Maat/ Size: made to fit phone
- Stof/ Fabric: stretch velours
10 Dec 2021

6 Sept 2021


11 Aug 2021
waszakken
Zelf waszakken maken hoeft niet moeilijk te zijn. Als voorbeeld heb ik een versleten waszakje gebruikt dat ik jaren geleden gekocht heb.

- dunne, zachte stof (mesh/gaas)
- koordje
- koordstopper
Alle drie de waszakken hebben dezelfde hoogte, maar de breedte is net iets anders. Mijn werkwijze:
- knip rechthoeken met een lange kant van 90cm en een korte kant van 35-40cm
- leg de twee korte kanten op elkaar waardoor een rechthoek van 45 bij 35-40cm ontstaat
- lock de 2 langste naden (ik heb een rolzoom met 4 draden gebruikt), laat daarbij aan een van de naden de bovenkant een stukje (~7cm) open voor de koordtunnel
- lock het open stukje naad (enkele laag stof) en de bovenkant van de waszak voor een nette afwerking
- vouw ca 2cm van de bovenkant om en stik deze door met de naaimachine, zodat een koordtunnel ontstaat
- koordje door de tunnel rijgen, stopje erop en dichtknopen
Patroon: gekochte (en inmiddels versleten) waszak
Maat: geknipt: breedte 35-40cm, lengte 90cm, koordtunnel: 2cm hoog
Stof: mesh/gaas
21 Nov 2020
Sinterklaas

Als de Sint weer in het land is, hoort daar ook passsende decoratie bij. Zeker dit jaar.
Aangezien ik niet een kant-en-klaar patroontje kon vinden dat me aanstond, heb ik zelf een kleurplaat omgezet in een telpatroon. Er zijn websites die dit voor je kunnen doen, maar een simpel plaatje kan ook prima omgezet worden met een programma als Paint. Dit kan door het aantal pixels te verlagen zodanig dat 1 pixel 1 kruissteek wordt. Aan de hand van het gewenste uiteindelijke formaat en het aantal draden/cm van de stof kun je het aantal steken (ofwel pixels) berekenen.
Een beetje puzzelen en improviseren was tijdens het borduren nog wel nodig, maar ik ben erg tevreden over het eindresultaat.
Een borduurring gebruiken voor de afwerking heeft veel voordelen: je kunt hem al gebruiken om de stof op spanning te houden tijdens het borduren, de afwerking is snel en ziet er mooi uit, en na 5 dec kan er gemakkelijk gewisseld worden naar een Kerst-/winterwerkje.
- Patroon: digitale kleurplaat
- Stof: Aida (17 st/cm / 18ct, rood)
- Garen: DMC 310
- Maat ring: 15cm doorsnede
13 Nov 2020
Cadeau-tasjes / Gift bags
In an effort to reduce the amount of (wrapping) paper used in this household, I recently started making gift bags out of fabric from my stash.
The size of the bag is determined by the size of the gift(s), and the size and shape of the fabric. I use a single layer of fabric that I sew into a rectangle, leaving the top 4-5cm of (at least) 1 side seam open to form the opening of the drawstring tunnel later on. To make the tunnel, I fold the fabric towards the inside (about 2-2.5cm) and stitch it in place. Add the drawstring and you're done.
Stof/ Fabric: katoen/ cotton

2 Nov 2020
DIY x-stitch accessory
The lapstand I used to stitch the corgi's has scroll bars with velcro on it. For the former project I used sticky velcro that I attached to the aida, so it would attach to the scroll bars. Although I finished that project in June, it just came off the frame. To be replaced by the Halloween Witch (Durene Jones). But I didn't have any sticky velcro left over and getting the right tension for stitching was impossible without attaching the aida to the scroll bars. So I took some regular velcro and sewed some scrap pieces of fashion fabric to it. Than I hand-stitched the aida to the fashion fabric and stuck the velcro to the scroll bars. All ready to stitch!

Maat/ Size: 50x??cm
Stof/ Fabric: katoen/ cotton
28 Jun 2020
Kussenslopen / Pillow Cases
Aangezien mijn nieuwe hoofdkussen niet in een standaard kussensloop past, leek het mij een goed idee om een aantal stofjes uit de voorraad te gebruiken voor nieuwe kussenslopen.
Maat/ Size:
- kussen/ pillow: 60x70cm
- sloop/ pillow case: 62x73cm, overlap 22cm (en een iets kleinere voor een kussen van 50x65cm)
Stof/ Fabric: katoen/ cotton

22 Sept 2019
Grime Guard
To prevent cross-stitch fabric of a larger project to become dusty/dirty, I made a simple grime guard. It is just a rectangle that can be made into a tube using safety pins. It is meant for the one large project I'll be stitching in hand.
At the time I made this, it seemed very useful, but now, after a few months, I hardly use it at all. We'll see if it gets more use in the future....

Patroon/ Pattern: zelf getekend/ self-drafted
Maat/ Size: 15x58cm (finished sizes)
Stof/ Fabric: katoen/ cotton
At the time I made this, it seemed very useful, but now, after a few months, I hardly use it at all. We'll see if it gets more use in the future....

Patroon/ Pattern: zelf getekend/ self-drafted
Maat/ Size: 15x58cm (finished sizes)
Stof/ Fabric: katoen/ cotton
13 Sept 2019
1787
This month an important historical event will be celebrated in our village and I have been asked if I will participate at the crafts fair/ farmers market. Of course, I will, but preferably not in my 21st century clothes. As the original event took place late 18th century I decided to do a little research on fashion during that time period, with the focus on the poor and middle class woman. (All those 18th century gowns look amazing, but the people who could afford them wouldn't be selling vegetables on a farmers market.)
In the end I decided not to make a historically correct outfit, for various reasons:
-1 time only event
-time restrictions (research, pattern making and putting the items together would have taken a lot of time)
-costs (meters and meters of fabric needed)
 Some colleagues came up with the idea to make something simple for the four of us: a simple skirt (made from curtains) and a scarf, to wear with a rtw white blouse or shirt. In addition I decided to make an apron to go over the skirt, as was common in those days, and a cap (inspiration and tutorials are linked below).
For the apron I used some cotton fabric that I was gifted years ago and the cap is made from an old cotton bed sheet.
Tutorials/ Inspiration:
algemeen/ general:
https://www.youtube.com/watch?v=nUmO7rBMdoU
mutsje/ cap:
http://www.couturemayah.info/eng18th%20century%20caps.html
http://www.marquise.de/en/1700/howto/frauen/18hauben.shtml
http://artbeautyandwell-orderedchaos.blogspot.com/2009/05/how-to-make-18th-century-cap.html
http://www.mutsenmaker.nl/ontwikkeling%20en%20groei.htm (in Dutch)
https://www.youtube.com/watch?v=1wS9EaXU2AI
schort/ apron:
http://colonialwilliamsburg.photoshelter.com/gallery-image/Under-the-Redcoat/G0000_W6aBiVlKIU/I0000eiQNkMYl2XE
http://villagegreenclothier.com/showroom/othergarments.html
22 Jul 2019
kamperen / camping - boxkleedhoes
Het was leuk om weer een boxkleedhoes te maken als kraamcadeautje voor een vriendin. Deze keer weer een met applicaties, geinspireerd op de Nijntje-boxkleedhoes dat ik jaren geleden samen met andere vriendinnen gemaakt heb. Voor dit boxkleed heb ik gekozen voor een kampeer/ vakantie thema, aangezien dit zowel goed bij ons (de betreffende vriendin en mij) past als bij de ouders van de kleine.


Eerst heb ik een aantal (digitale) schetsen gemaakt en uit de variaties de leukste gekozen. Voor de bomen, bloemen en de tent heb ik kleurplaten als basis gebruikt.
De wereldkaart op de achterkant van de hoes kwam ik op de stoffenmarkt tegen en vond ik erg passend. De meeste andere stoffen had ik nog liggen van andere projectjes en heb ik er op kleur/ toepasselijkheid bijgezocht.

Patroon/ Pattern: eigen ontwerp/ own design
Maat/ Size: 99x81cm
Stof/ Fabric: katoen/ cotton
27 Feb 2018
Buffs

Afmetingen (zonder aangeknipte naad):
kind:
1x 40x46cm tricot/jersey
1x 20x46cm warme stof (bijv. velours/ sweat/ fleece)
volwassene:
1x 40x50cm tricot/jersey
1x 20x50cm warme stof (bijv. velours/ sweat/ fleece)
9 Mar 2017
Zakjes / Little pouches
 |
| vlnr: Be'cup, own, own, Me-Luna |
Pouches for menstrual cups. The left pouch is from Be'Cup, the right from Me-Luna. The latter is used as model for the 2 pouches in the middle.
Maat/ Size: ~9,5x14cm
Stof/ Fabric:
licht blauw: synthetisch
bloemen: tricot
light blue: synthetic
flowers: jersey
8 Mar 2017
Hoesjes voor hondenmatjes / Dog bed covers

Hondenkussens/ Dog beds:
- boven: 105x70x~30cm
- onder: 100x75x19cm
Hoezen (incl. naad)/ Covers (incl. seam allowances):
- boven: 107x72x27cm (naad/ seam: 0,7cm)
- onder: 102x77x21cm (naad/ seam: 0,5cm)
Stof/ Fabric:
bovenkant: fleece
zijkanten: denim(?)
onderkant: 1x denim(?) & 1x iets wolligs (something woolly)
1 korte kant is dubbel (1x fleece & 1x denim) om de opening netjes weg te werken.
1 short side is doubled (1x fleece & 1x denim) to cover the opening and keep the cover in place.
24 Jan 2017
Petshirts (post-op)
Vorig jaar werden er vrijwilligers gevraagd om post-operatieve honden'jasjes' te maken voor Scooby, een asiel in Spanje waar voornamelijk Galgo's opgevangen worden. Zeker 1x per jaar gaan een aantal Nederlandse dierenartsen en assistentes (m/v) een week naar Spanje om daar vrijwillig dieren te steriliseren/ castreren.
Er altijd wel een aantal honden zijn die niet van de wonden en hechtingen af kunnen blijven, en om deze honden tegen zichzelf te beschermen is er afgelopen jaar ge-experimenteerd met een geimproviseerd petshirt:
Om dit jaar (beter) voorbereid te zijn, werd er gevraagd of er iemand was die van tevoren al een aantal shirts kon maken. Na toegezegd te hebben, ben ik me gaan orienteren op de mogelijkheden: model(len), patronen, en natuurlijk stof.
Na wat mailen, kreeg ik een erg positieve reactie van de mensen achter Bertrums.nl. Via hen heb ik dan ook (met flinke korting) 40 m etalageflanel aangeschaft. Alles werd netjes ingepakt en op rol bezorgd:

Een belangrijke voorwaarde waar het medische shirt aan moest voldoen is dat de honden zonder aan- en uitkleden hun behoefte moeten kunnen doen. Mijn eigen monstertje was model bij het experimenteren met verschillende
patronen, varierend van volledige buik bedekt tot broekjes al dan niet met
'bretels'.
Uiteindelijk hebben we, na overleg, besloten dicht bij het oorspronkelijke idee te blijven: een rechthoekige of vierkante lap met stroken die op de rug van de hond vastgeknoopt kunnen worden, 4 gaten voor de poten en indien nodig een gat voor de staart, waardoor de anus ook vrij is, en een voor de penis (reu). Voor de teven kan de stof zodanig ingescheurd worden dat de vulva vrij komt.
Voor de afmetingen hebben we ongeveer 120x120cm aangehouden, waarbij zelfkanten van de stof de voor- en achterkant vormen. De beide andere kanten hebben stroken van ongeveer 10cm breed en 30cm lang. Aangezien flanel zich gemakkelijk laat scheuren als er een beginnetje is, kan het buikgedeelte voor smalle honden gemakkelijk smaller gemaakt worden door de stroken te verlengen (stof verder inscheuren). Voordeel is ook dat als 120cm te lang is er gemakkelijk een stuk afgescheurd kan worden (gaat sneller dan knippen).
Om het voor een zo groot mogelijke variatie aan honden te kunnen gebruiken, is er besloten om de gaten (voor de poten, etc) er ter plekke in te maken, door het shirt bij de hals van de hond vast te knopen en dan een schatting te maken waar de voorpoten erdoor moeten, inknippen, poten erdoor, doorknopen naar achteren en voor de achterpoten herhalen. Een andere mogelijkheid is om om de achterpoten heen te knopen.
De 40 m stof bleek uiteindelijk voldoende voor ruim 30 petshirts.
Maat/ Size: 120 x stofbreedte/ fabric width
Stof/ Fabric: Flanel/ Flannel
Er altijd wel een aantal honden zijn die niet van de wonden en hechtingen af kunnen blijven, en om deze honden tegen zichzelf te beschermen is er afgelopen jaar ge-experimenteerd met een geimproviseerd petshirt:
 |
| (dit is niet mijn foto, ik heb 'm alleen een beetje bewerkt) |
Om dit jaar (beter) voorbereid te zijn, werd er gevraagd of er iemand was die van tevoren al een aantal shirts kon maken. Na toegezegd te hebben, ben ik me gaan orienteren op de mogelijkheden: model(len), patronen, en natuurlijk stof.
Na wat mailen, kreeg ik een erg positieve reactie van de mensen achter Bertrums.nl. Via hen heb ik dan ook (met flinke korting) 40 m etalageflanel aangeschaft. Alles werd netjes ingepakt en op rol bezorgd:
 |
| Met dank aan Bertrums.nl |

 |
| Het model |
Voor de afmetingen hebben we ongeveer 120x120cm aangehouden, waarbij zelfkanten van de stof de voor- en achterkant vormen. De beide andere kanten hebben stroken van ongeveer 10cm breed en 30cm lang. Aangezien flanel zich gemakkelijk laat scheuren als er een beginnetje is, kan het buikgedeelte voor smalle honden gemakkelijk smaller gemaakt worden door de stroken te verlengen (stof verder inscheuren). Voordeel is ook dat als 120cm te lang is er gemakkelijk een stuk afgescheurd kan worden (gaat sneller dan knippen).
 |
| Het 'patroon' |
Om het voor een zo groot mogelijke variatie aan honden te kunnen gebruiken, is er besloten om de gaten (voor de poten, etc) er ter plekke in te maken, door het shirt bij de hals van de hond vast te knopen en dan een schatting te maken waar de voorpoten erdoor moeten, inknippen, poten erdoor, doorknopen naar achteren en voor de achterpoten herhalen. Een andere mogelijkheid is om om de achterpoten heen te knopen.
De 40 m stof bleek uiteindelijk voldoende voor ruim 30 petshirts.
Maat/ Size: 120 x stofbreedte/ fabric width
Stof/ Fabric: Flanel/ Flannel
21 Jan 2017
Tweezijdige superhelden cape / Double-sided superhero cape
Verjaardagscadeautje voor mijn neefje. / Birthday present for my little nephew.


Inspiratie/ Inspiration: Capron - Craft Remedy
Maat/ Size: child
Stof/ Fabric: Katoen/ Cotton
Patroon Cape/ Cape pattern (starting point): Superhelden - Kid5
Logo:
- 'Superman': photokapi.com
- Batman: Max California
The idea was born, and the fabric was bought. It was time to conquer my fear for self-drafted patterns and appliques!
As I didn't want to start totally from scratch, and to get an indication of sizes for a 5/6 yr old, I used the cape pattern from Kid5 (Superhelden) and the Capron tutorial from Craft Remedy as starting point.
 The Cape:
I used the length of the largest size of the pattern and adjusted the shoulder part of the cape to fit the shoulder part of the front (~5 cm wide), keeping most of the original neck line.
The Front:
Starting out with a rectangle of about 25cm wide and 30 cm high (without seam allowances) and drew a deep neckline to adjust for the needed overlap (velcro) with the shoulder part of the cape (~5 cm wide). The waistband (5 cm wide, >70 cm long) was added later.

The Appliques:
For the appliques, especially for the Superman ones, I used the method shown in this tutorial from Schnabelinas Welt, using a size '6' zigzag the first time round and a size '7' the second time.
After adding stabilizer to the fabrics, I used the templates to trace the logos on the fabric.
For the Batman one, the bats were cut out before sewing on the background, the rims of the yellow oval where trimmed after the first round of zigzagging.
 For Superman, after transferring the logo I sewed both pieces together along the outer line (with a straight stitch). Then I zigzagged along the inner lines, cut away the inner red fabric and zigzagged the inner lines for the second time. After zigzagging the logo to the background, I trimmed along the outer lines before the second zigzag run. Luckily this revealed a small line of yellow making the logo on the cape (red on red) stand out just a little more.
Merging both sides:
Both capes were surged together, leaving a turning hole along one of the sides. After turning the right side out, I topstiched along the edge.
Both front parts were also surged together, leaving the bottom open, and topstitched after turning.
 Waistband:
 Adding the waistband turned out to be a challenge. What worked best for me (had to do it twice as the first waistband turned out to be too short) was surging the waistband to the appliquéd part and continue that seam till finished, sewing both rounded edges, surging the underside of the waistband to the point where the upper part gets in the way. Than turn waistband right side out, iron the seam allowance to the inside of the open part, topstitch whole waistband in one run, closing the 'gap'.
Last steps:
Adding velcro (3 cm wide, ~5-7 cm long) to shoulder parts and waistband. Iron one last time....
8 Jun 2016
Poppenbeddengoed

 Matras: ongebleekte katoen met fiberfill vulling
Hoeslaken: katoen
Dekbed: fleece (1 laag)
Dekbedovertrek: katoen
Afmetingen bedje: 50x20 cm
Afmetingen matras: 50x20 cm
Afmetingen dekbed: 49x40 cm
Afmetingen dekbedovertrek: 51x40.5 cm (instopstrook 14 cm breed --> is wat smal)
17 May 2016
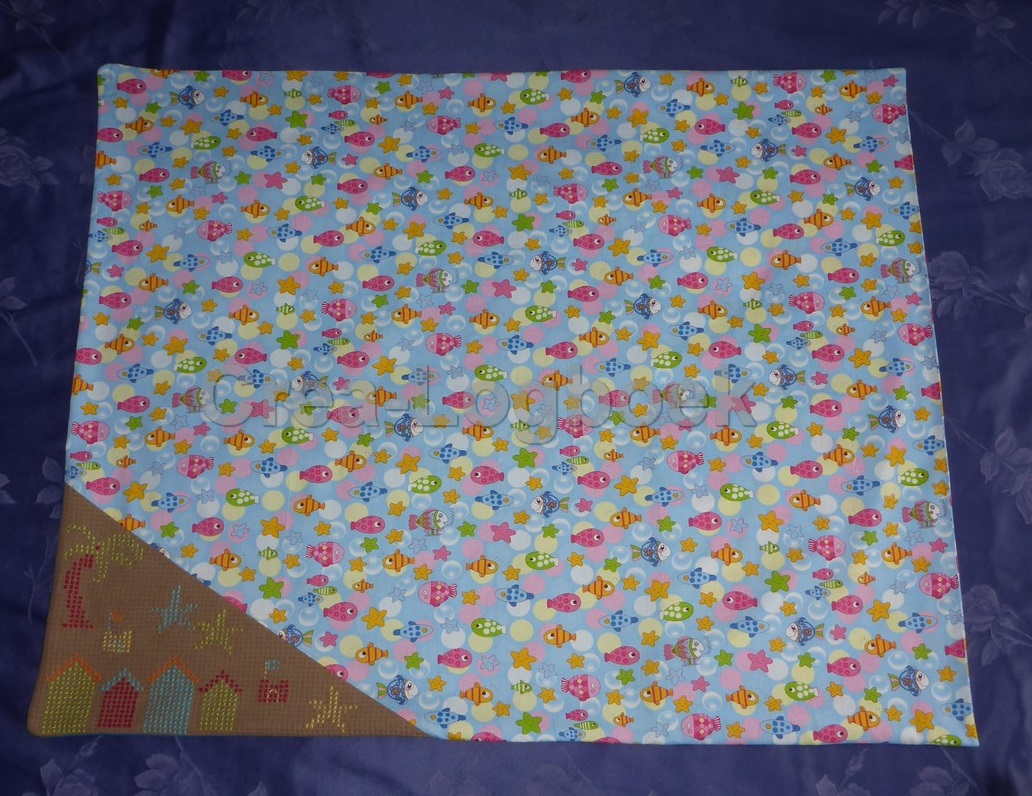
Going Coastal
Het thema van het 'meiden'-kraamcadeau is deze keer: kust (strand & zee). Aangezien meisje nr. 3 in aantocht is, was het nog best lastig om iets leuks te bedenken. Uiteindelijk is het een hoes voor een boxkleed met een bijpassend speenkoord geworden.

Het 'strand' is een restant van deze boxkleedhoes, die ik voor een andere vriendin uit hetzelfde vriendengroepje gemaakt heb. Het fijne van de wafelstof is dat het aan de bovenkant uit mooie vierkantjes bestaat, waardoor het gemakkelijk met kruissteekjes te versieren is.
In eerste instantie heb ik mij laten inspireren door de 'Summer in Swanage blanket' van Dedri (Look At What I Made). Helaas had ik niet meer genoeg van de wafelstof om een brede rand met strandhuisjes te kunnen borduren.
Na wat aanpassingen is dit het eindresultaat:
 1 palmboom
2 zandkastelen
3 zeesterren
4 strandhuisjes
Stof: wafelstof (beige), katoen (vissen), babyribstof (blauw)
Afmetingen boxkleed: 100x80cm
Afmetingen hoes: 104x83cm
Terugslag: 35cm
Zoom terugslag: 1,5cm
Zoom onderkant: 2,5cm
Om het af te maken heb ik er nog een speenkoord van de effen blauwe stof bij gemaakt.
 Stof: babyribstof
Afmetingen: 20x~2cm
Werkwijze:
-strook stof van 40x4cm afwerken (lockmachine)
-bretelklip aanschuiven
-korte kanten op elkaar stikken met koordje ertussen
-zijkanten vaststikken, keergat open houden (aan bretelclip-kant)
-speenkoord omkeren
-doorstikken
This time, the theme of the 'girly'-baby shower gift is: coast (beach & sea). It was relatively hard to think of something to make, as the family is expecting girl no. 3 soon. I decided to go with the play mat cover and a matching pacifier clip.
 For the 'beach' I used a piece of the fabric that I used before to make this play mat cover for a friend from the same group of friends. Due to the little squares, the waffle fabric is easy to decorate with cross stitch designs.
The 'Summer in Swanage blanket' van Dedri (Look At What I Made) is definitely my source of inspiration for this cover, but unfortunately I didn't have enough fabric left for a wide beach with embroidered beach huts.
So, I changed plans and came up with:
1 palm tree
2 sand castles
3 starfish
4 beach huts
Fabric: waffle (beige), cotton (fish), ribbed fabric (not knit) (blue)
Dimensions play mat: 100x80cm
Dimensions cover: 104x83cm
Back : 35cm
Hem 'terugslag': 1.5cm
Hem backside: 2.5cm
As a finishing touch I added a pacifier clip, made from the blue ribbed fabric (Sorry, I don't know the proper English name for the fabric.)
Fabric: ribbed (no knit)
Dimensions: 20x~2cm
How to:
-finish off a strip of fabric (40x4cm, serger)
-add suspender clip
-sew short side together (right sides togehter), including a cord for the loop
-sew long sides together, except for a small hole near the suspender clip
-turn right sides out
-top stitch

Het 'strand' is een restant van deze boxkleedhoes, die ik voor een andere vriendin uit hetzelfde vriendengroepje gemaakt heb. Het fijne van de wafelstof is dat het aan de bovenkant uit mooie vierkantjes bestaat, waardoor het gemakkelijk met kruissteekjes te versieren is.
In eerste instantie heb ik mij laten inspireren door de 'Summer in Swanage blanket' van Dedri (Look At What I Made). Helaas had ik niet meer genoeg van de wafelstof om een brede rand met strandhuisjes te kunnen borduren.
Na wat aanpassingen is dit het eindresultaat:
 1 palmboom
2 zandkastelen
3 zeesterren
4 strandhuisjes
Stof: wafelstof (beige), katoen (vissen), babyribstof (blauw)
Afmetingen boxkleed: 100x80cm
Afmetingen hoes: 104x83cm
Terugslag: 35cm
Zoom terugslag: 1,5cm
Zoom onderkant: 2,5cm
Om het af te maken heb ik er nog een speenkoord van de effen blauwe stof bij gemaakt.
 Stof: babyribstof
Afmetingen: 20x~2cm
Werkwijze:
-strook stof van 40x4cm afwerken (lockmachine)
-bretelklip aanschuiven
-korte kanten op elkaar stikken met koordje ertussen
-zijkanten vaststikken, keergat open houden (aan bretelclip-kant)
-speenkoord omkeren
-doorstikken
This time, the theme of the 'girly'-baby shower gift is: coast (beach & sea). It was relatively hard to think of something to make, as the family is expecting girl no. 3 soon. I decided to go with the play mat cover and a matching pacifier clip.
 For the 'beach' I used a piece of the fabric that I used before to make this play mat cover for a friend from the same group of friends. Due to the little squares, the waffle fabric is easy to decorate with cross stitch designs.
The 'Summer in Swanage blanket' van Dedri (Look At What I Made) is definitely my source of inspiration for this cover, but unfortunately I didn't have enough fabric left for a wide beach with embroidered beach huts.
So, I changed plans and came up with:
1 palm tree
2 sand castles
3 starfish
4 beach huts
 |
| Zomen / Hems |
Fabric: waffle (beige), cotton (fish), ribbed fabric (not knit) (blue)
Dimensions play mat: 100x80cm
Dimensions cover: 104x83cm
Back : 35cm
Hem 'terugslag': 1.5cm
Hem backside: 2.5cm
As a finishing touch I added a pacifier clip, made from the blue ribbed fabric (Sorry, I don't know the proper English name for the fabric.)
Fabric: ribbed (no knit)
Dimensions: 20x~2cm
How to:
-finish off a strip of fabric (40x4cm, serger)
-add suspender clip
-sew short side together (right sides togehter), including a cord for the loop
-sew long sides together, except for a small hole near the suspender clip
-turn right sides out
-top stitch

28 Nov 2015
Labels


 Tutorial koord:
-opzetstokjes tot een lengte van ~19cm
-6 lossen
-halve vaste in laatste opzetstokje om het lusje te maken
-halve vaste in 2 opvolgende opzetstokjes, afhechten
Tutorial chain:
-FDC to a length of ~19cm
-chain 6
-slip stitch in last FDC to create loop
-slip stitch in next to FDC, Fasten off.
Garen/ Yarn: Mini (Wibra)
Haaknaald/ Hook: 4mm

Subscribe to:
Posts (Atom)